本指南涵盖了Terraria1.3.5.3目前为止中出现的所有事件。
血月[ | ]
血月是玩家通常遇到的第一个事件,因为一但玩家的生命值达到120以上,它每晚有1/9的机会发生。在活动期间,屏幕上敌人出现的最大数量和生成率都急剧增加,成群的敌人会在同一时间出现。此外,怪物的产生会完全无视NPC所造成的生成率的降低。在这个事件中,僵尸获得了破门而入的能力,给房屋内的NPC带来了巨大的危险。新的敌人,如 ![]() 滴滴怪,
滴滴怪, ![]() 腥僵, 以及困难模式下的
腥僵, 以及困难模式下的 ![]() 小丑 也会产生。
小丑 也会产生。
事实证明,这个事件会加大你在最初泰拉瑞亚冒险中的难度。然而, 这也是非常有利可图的,因为滴滴怪和血腥僵尸有机会掉落![]() 鲨牙项链和
鲨牙项链和![]() 钱币槽,这两样东西都是独一无二的,特别有用。此外, 增加的生成率将适用于整个世界, 使养成特有生物群落的物品更加容易。
钱币槽,这两样东西都是独一无二的,特别有用。此外, 增加的生成率将适用于整个世界, 使养成特有生物群落的物品更加容易。
一般来说,只要把所有的门都堵住,不让它们由外面打开,或者干脆把入口完全堵住,就可以在 "血月 "中生存下来。
哥布林军队[ | ]
| 有人建议该页面或其部分与Guide:Goblin Army strategies合并。 |
哥布林会出现在出生点,并杀死他们找到的任何NPC。他们会不断地生成,直到进度条满了为止,这时他们就被打败了。它们可以通过使用![]() 哥布林战旗生成, 或者在黎明时有1/20的几率在摧毁至少一个
哥布林战旗生成, 或者在黎明时有1/20的几率在摧毁至少一个![]() 暗影珠 /
暗影珠 / ![]() 猩红之心之后,有至少一个玩家达到 200 生命之后产生。
猩红之心之后,有至少一个玩家达到 200 生命之后产生。
哥布林有多种类型的单位,具有不同的攻击模式,所以对付他们的策略取决于哥布林的类型。
 哥布林苦力, 一个没有特殊特点的普通敌人。
- 哥布林巫士, 它发射的混沌球可以穿透物块。
- 哥布林盗贼,一个迅速的敌人,可以跳得很高,并能更快地破门而入。
- 哥布林战士, 一个具有非常高的生命和抗击退能力的敌人。
- 哥布林弓箭手会向玩家射出木箭。
- 哥布林召唤师 是困难模式的专属,它是一个可以飞行的小 Boss,可以发射更强的哥布林巫师混沌球,并可以召唤 影焰幻. 杀死它后会掉落一件独特的暗影焰武器。
基地附近的一块长而平坦的场地将是对付军队的最佳地点,因为它离出生点足够近,出现的同时可以让哥布林远离NPC。一次能对多个敌人造成伤害的武器,如 ![]() 太空枪 or
太空枪 or ![]() 丑之 ,对消灭敌群很有用。
丑之 ,对消灭敌群很有用。
在你的基地两侧各挖一个坑是一个简单而有效的方法,可以挡住大部分的哥布林,因为如果坑够深,他们就无法跳出来。然而哥布林弓箭手仍然会射击,而且它不能防止玩家不受哥布林巫师的伤害。
撒旦军队[ | ]
| 有人建议该页面或其部分与Guide:Old One's Army strategies合并。 |
撒旦军队是一个独特的事件,因为玩家在游戏中的进展越大,它就越高级,而且敌人不会专注于杀死玩家,相反,他们会试图摧毁用来召唤它的 ![]() 永恒水晶 。敌人会掉落一种独特的临时物品
永恒水晶 。敌人会掉落一种独特的临时物品 ![]() 埃特尼亚魔力, 用来召唤酒馆老板的哨兵,事件结束后就会消失。
埃特尼亚魔力, 用来召唤酒馆老板的哨兵,事件结束后就会消失。
该事件分为7(第一级别5个,第二级别6个)波 ,每波都比上一波更难。当所有波次都完成后,事件将结束,玩家将获得护卫奖章和在事件之外使用酒馆老板的哨兵的能力。如果 ![]() 永恒水晶 被敌人摧毁,事件将提前结束,玩家不会得到任何奖励。
永恒水晶 被敌人摧毁,事件将提前结束,玩家不会得到任何奖励。
海盗入侵[ | ]
海盗入侵可以被认为是哥布林军队的困难模式的版本,具有类似的产生条件和更强大的敌人。
在摧毁至少一个 ![]() 恶魔祭坛 /
恶魔祭坛 / ![]() 猩红祭坛之后如果它尚未被击败,将有~4%的几率发生。否则有~2%的几率发生。
猩红祭坛之后如果它尚未被击败,将有~4%的几率发生。否则有~2%的几率发生。
它还可以通过使用![]() 海盗地图来召唤。
海盗地图来召唤。
海盗入侵有多种类型的单位,具有不同的攻击模式。事件目前包含六个(电脑版、主机版、和移动版七个)敌人:
- 海盗水手, 就像哥布林苦力一样,他是一个没有特殊攻击的普通敌人。
- 海盗弩手, 用她的弩射出高伤害的烈焰箭。
- 鹦鹉, 一个飞行的敌人,生命值低但伤害高。
- 海盗神射手, 他以极快的速度射出子弹。
- 私船海盗, 一个速度非常快的敌人,具有很高的抗击退能力和伤害。
- 海盗船长, 一个能够以比海盗神射手更快的速度发射高伤害子弹的小 Boss。它偶尔会发射一个炮弹,击中后会造成大量伤害。
- 荷兰飞盗船, 一个飞行Boss,会产生其他海盗并发射炮弹。只有摧毁它的所有大炮才能杀死它。

由于所有敌人都有很高的属性,在困难模式的开始阶段,击败入侵者并不是一件容易的事。对付海盗不应该在空地上作战,因为海盗弩手和海盗神射手射出的弩箭/子弹可以轻易地压制玩家。站在地面上的封闭空间里,可以更容易地应对这一事件,因为没有一个敌人有能力通过物块进行攻击。
日食[ | ]
在任意一个机械 Boss 被打败后,日食有 5*1/20 (5%) 的几率在任何一天开始发生。该事件将产生非常强大的敌人,其中大部分也有特殊的掉落:
- 泽, 里 和 学怪他们的行为和僵尸一样,但他们的速度更快,明显拥有更高的属性。
- 水月怪 是类似的,但在水中会变得更快。它在被杀时有很低的几率掉落 海神贝壳 。
- 攀爬魔 的速度非常快,并有能力在墙上爬行,这样做时会变得更快,更不容易被击退。
- 血 的伤害很高,如果玩家在它们上面,可以变成蝙蝠。 它们被击杀时极少会掉落 月亮石 或 破蝙蝠之翼 。
- 是一种不常见的敌人,它的眼睛有发射激光的能力。它在被击杀死后有几率掉落 弹簧眼宠物。
在所有三个 机械 Boss被打败后,还会有一个敌人和一个小Boss生成:
- 死神的行为类似 幻灵,但属性会更高。 他们被击杀时有很低的几率掉落他们的 镰。
- 蛾怪 是这次事件的小Boss。它的攻击方式是向玩家猛冲,而且会停下来在地上产卵,如果不杀死,就会孵化成蛾怪宝宝。它在被杀死时偶尔会掉落断裂英雄剑 而在击败 世纪之花后,会掉落 克苏鲁之眼 和 蛾怪之翼.
在击败世纪之花后,还会有更多的敌人生成:
- 的速度非常快,并能造成高额的接触伤害。它们在被击杀时极少会掉落它们的 。
- 命 的速度并不快,但它们的高伤害和高防御使它们变的非常危险。由于它们的体积小,可能很难看到,所以总是要谨慎点。他们在被击杀时极少会掉落致命球法杖 。
- 蝇人博的生命值很低,但他们投掷的 毒气瓶会造成严重的范围伤害。它们在被击杀时有几率掉落 毒气瓶 。
- 的速度很慢,但有极高的生命值,并射出多个低伤害的钉子。它们在被击杀时极少掉落 钉枪 。
- 态 将在几乎看不见的隐形状态下,当玩家靠近时,他们将开始攻击。他们的伤害非常高,所以必须始终注意他们。
只有![]() 蛾怪 和
蛾怪 和 ![]() 死神具有穿过物块的能力, 所以如果没有一个简单的出口,在地面上的盒子里战斗就不那么可靠。
死神具有穿过物块的能力, 所以如果没有一个简单的出口,在地面上的盒子里战斗就不那么可靠。
雪人军团[ | ]
雪人军团不会自己出现。玩家必须从 ![]() 礼物 中获得
礼物 中获得 ![]() 水晶雪球 来召唤它们。召唤物品只能在困难模式中获得,但军团在困难模式之前的世界中仍然可以召唤和击败。
水晶雪球 来召唤它们。召唤物品只能在困难模式中获得,但军团在困难模式之前的世界中仍然可以召唤和击败。
雪人军团有三个独特的敌人,分别叫 ![]() 戳刺先生,
戳刺先生, ![]() 雪人暴徒, 和
雪人暴徒, 和 ![]() 巴拉雪人。
巴拉雪人。
雪人无法从简单的木平台上跳下来,这意味着可以建造一个普通的坑,在它上面用一个木平台,并且完全不受伤害。
如果你在房子的任意一边放置熔岩坑,你可以打败大部分产生的雪人,然而,雪人可能会通过投掷![]() 雪块来阻挡陷阱,使其效果大打折扣。用平台填满陷阱的空隙,可以防止“雪块”挡住陷阱。它们与其他家具占据同一层,不会妨碍移动。另一个尽可能多杀死雪人的好办法是放置并使用大炮,大炮由海盗NPC以25金币出售。
雪块来阻挡陷阱,使其效果大打折扣。用平台填满陷阱的空隙,可以防止“雪块”挡住陷阱。它们与其他家具占据同一层,不会妨碍移动。另一个尽可能多杀死雪人的好办法是放置并使用大炮,大炮由海盗NPC以25金币出售。
霜月[ | ]
| 有人建议该页面或其部分与Guide:Frost Moon strategies合并。 |
霜月是一个困难模式下世纪之花后的事件,其中入侵世界的敌人是以圣诞节为主题的。只有在夜间的时候制作并使用一个![]() 调皮礼物才能开启它。
调皮礼物才能开启它。
该事件由19波组成,在所有波次完成后,还有最终的第20波。
南瓜月[ | ]
| 有人建议该页面或其部分与Guide:Pumpkin Moon strategies合并。 |
南瓜月是一个困难模式下世纪之花后的事件, 其中入侵世界的敌人是以万圣节为主题的。只有在夜间的时候制作并使用一个 ![]() 南瓜月勋章才能开启它。
南瓜月勋章才能开启它。
该事件由14波组成,接着的最终的第15波持续晚上结束。
火星暴乱[ | ]
| 有人建议该页面或其部分与Guide:Martian Madness strategies合并。 |
火星暴乱 是石巨人后的事件。 只有当玩家在野外发现 ![]() 火星探测器,然后让它逃到太空时,才会发生这种情况。
火星探测器,然后让它逃到太空时,才会发生这种情况。
在入侵过程中,玩家将发现许多强大的敌人具有不同的攻击,如:
- 咕, 是这次事件的普通敌人。
- 光枪, 拥有类似的行为,但属性较低,能够用枪发射激光。
- 星走 是一种速度非常快的敌人,可以快速发射激光,拥有大量的生命 并且对 击退免疫。由于他们高大的体型和低跳跃,他们很容易被阻挡住。
- 星飞 是小敌怪 ,伤害 和生命都很低。它只能通过向玩家猛冲来进行攻击,它本身一接触就会自我毁灭。 它是入侵行动中唯一可以穿透物块的敌人。
- 击 的行为与灰咕噜 相似,但它们在击中时造成 带电的减益 ,这将使玩家在移动时迅速失去生命 。
- 星工程 的属性很低,但他们可以部署 斯拉炮,向玩家射出电光弹,从而造成带电的 减益 。 应该迅速杀死工程师,因为它们可以很容易地用炮塔压制玩家。
- 星军 会生成一个 泡泡护盾保护着,玩家需要在之前杀死它。如果泡泡护盾被摧毁后没有迅速杀死军官,它将再次激活。
- 脑 与激光枪手 相似,他们的绿色激光弹在击中后会造成 困惑 减益。
- 火星飞碟 是这个事件 的Boss。它将交替使用炮塔向玩家的位置发射激光, 大炮发射自动寻的导弹, 然后在使用死亡射线 攻击玩家。在它的 炮塔 和大炮被摧毁后,玩家将能够对它的核心造成伤害,但它的 死亡射线会造成更大的伤害。飞碟 也将比以前更积极地行动。 杀死后,它会掉落一个独特的武器或物品。
和其他事件一样,几乎所有的敌人都缺乏直接攻击或穿过物块的能力 ,所以站在一个封闭的空间里会是一个好主意,尤其是在1.4.0.1之前, 火星飞碟 在空旷的地方很难被打败。
熔岩坑也很有效,因为它可以在玩家专注于火星飞碟的时候,对付地面上的敌人。请注意,熔岩会在鳞甲怪枪手之前杀死 鳞甲怪 , 所以如果玩家想要 扰脑怪物品的话,就不应该这样做。
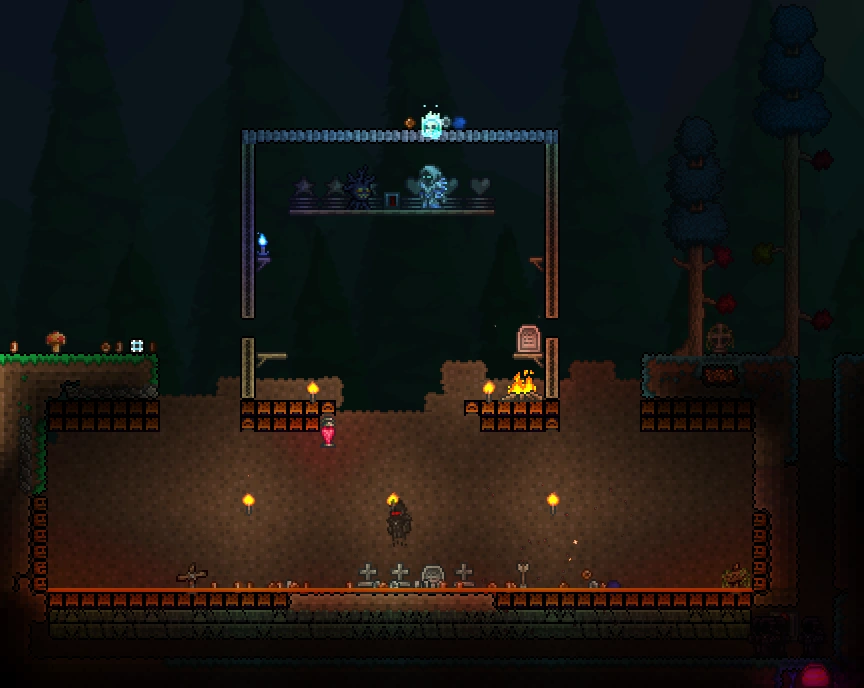
一个熔岩坑的例子,配有 心/星星雕像 和与 计时器相连的陷阱。
月亮事件[ | ]
| 有人建议该页面或其部分与Guide:Lunar Events strategies合并。 |
月亮事件 会在击败 拜月教邪教徒 Boss 后发生。入侵由四个天界柱 组成,放在世界的一个特定地方。它们每个人都专注于四个类别中的一个:近战, 远程,魔法和召唤师分别代表 日耀, 星旋, 和星尘柱。
当靠近天柱时,许多不同的敌人会开始攻击玩家。为了破坏天柱,玩家需要杀死 100/150 个敌人来摧毁保护它的盾 。
在打败四个天柱 后,会出现 "即将到来的厄运 "的信息,不久后月神就会产生。
通用攻略[ | ]
通用技巧[ | ]
This content is transcluded from 指南:实用技巧 § 战斗.
- 准备好你的 Boss 战场 有足够的光源,篝火 和红心灯笼用于生命再生,如果你使用魔法,星星瓶可用于法力再生。巴斯特雕像将提供一个可观的防御性提升。花园侏儒能提高运气,可减少所受的伤害并提高造成的伤害。池也可以用来进行额外的生命值再生。
- 向日葵 会给半径 50 个物块内的玩家施加快乐!增益,给予 +10% 的移动速度奖励并降低 17% 的敌怪生成率。
- 至少始终携带一叠最高级的治疗药水(弱效治疗药水、治疗药水、强效治疗药水或超级治疗药水)。仅仅依靠自然的生命再生并不是一个好主意。
- 建议为在战场中的树妖 和护士 NPC 建造房屋。前者可以施放树妖祝福 增益,增加你的防御力, 并为你提供类似荆棘药水的效果,而后者可以即时治疗和消除减益,但需要花费一些 。
- Boss 会显示在小地图上: 在你苦苦寻找的时候,可以按照 Boss 的图标来追踪它。你可以通过查看其各自的 Wiki 页面,来识别 Boss 的图标。
- 如果你已经你在地牢中救出了机械师,你就可以使用电线来激活以及提供生命与法力回复的 心形雕像和星星雕像。前者可以帮你攻击敌怪,但要注意摆放位置,以免在战斗中伤害到自己。后者可以分别连接心形雕像和星星雕像来提供心 和星星。把这些雕像连接到时来启动它。
- 你可以在挑战任何更难的 Boss 之前先召唤并杀死克苏鲁之眼或史莱姆王,这样可以创造一个额外的一次性红心池。注意,这将阻止任何心雕像产生新的心。
- 在你去探索、进行Boss战或入侵之前,记得使用利器站、弹药箱、水晶球、施法桌和蛋糕块 。这些会给玩家带来有用的增益,前四种是特殊物品。它们分别提供锋利、药、灵视、着魔和糖果冲刺。
大炮[ | ]
从 海盗 那里购买![]() 大炮 和
大炮 和 ![]() 兔兔炮,带来了强大的火力来保护基地。请记住,你必须在 大炮旁边(并且有弹药)才能有效地使用它; 当用 电线远程使用时,大炮的炮弹不会造成任何伤害。
兔兔炮,带来了强大的火力来保护基地。请记住,你必须在 大炮旁边(并且有弹药)才能有效地使用它; 当用 电线远程使用时,大炮的炮弹不会造成任何伤害。
熔岩[ | ]
熔岩是轻松杀死敌人的有效手段。把一桶熔岩放置在一个足够宽的1个物块深的坑中,就有可能创造出一个足够浅的池子来杀死大多数敌人,同时保留他们的战利品(这种陷阱可以通过将廉价物品扔进坑里来轻松测试--如果它们燃烧起来,坑就需要加宽)。
请注意,被熔岩杀死的敌人不会被 ![]() 杀怪计数器 记录,也不会获得旗帜。
杀怪计数器 记录,也不会获得旗帜。
熔岩护城河[ | ]
由于怪物不能在熔岩上生成,你可以迫使怪物在一个缩小的区域内生成,以便更有效地用 机关, 哨兵, 和其它 攻击来影响它们。 创建一个10至15个物块宽的 "生成面"。Surround it by lava moats about 40 blocks wide on both sides, and fill up any nearby holes or cave. While the event is happening, make sure to keep the spawn surface out of sight, for instance by standing on a platform high enough above it.
This will make the enemies spawn in one, concentrated area where they can easily be killed by Traps, lava or Area of Effect weapons.
Sentries[ | ]
Events are the ideal situation for using sentry summons, as they are powerful but stationary defenses, and you have to defend an area. Using an armor set from the Tavernkeep to allow to summon several sentries will let you take care of most regular enemies as quickly as they arrive, allowing you to concentrate on the stronger menaces. With a Bewitching Table and a ![]() 召唤药水 you can combine sentries with a few more mobile minions for assistance. Sentries can also be combined with weapons that have a lasting area of effect, such as the
召唤药水 you can combine sentries with a few more mobile minions for assistance. Sentries can also be combined with weapons that have a lasting area of effect, such as the ![]() 雨云魔杖 and the
雨云魔杖 and the ![]() 彩虹枪.
彩虹枪.
Traps[ | ]
Traps can be used to help damage enemies. Dart Traps can be found throughout the Underground and especially in the Dungeon, Geysers are found in the Underground, and Super Dart Traps, Flame Traps, Spear Traps, and Spiky Ball Traps are all found in the Lihzard Temple.
| Trap | Cooldown | Direction | Range | Damage | Debuff |
|---|---|---|---|---|---|
| 3.333 | Up, Down, Left, or Right | 2700 | 20 | ||
| 3.333 | Left or Right |
20 | 40 | ||
| 4.0 | Up or Down | 20 | 80 | ||
| 1.5 | Up, Down, Left, or Right | 20 | 60 | ||
| 5.0 | Up or Down |
Unlimited | 40 | ||
| 3.333 | Left or Right |
2700 | 40 |
When multiple traps are used, they should be staggered so as not to all hit at the same time: an enemy hit by a trap will be briefly invulnerable due to its piercing properties, so if a monster is hit by two simultaneous darts, only one will damage it.
Dart Traps and Super Dart Traps can protect the sides of your base from low-level threats, such as the Blood Moon zombies, especially if rigged to automatic activation mechanisms such as Timers, or Pressure Plates in an engine. Flame Traps, Geysers, Spear Traps, and Spiky Ball Traps are more powerful but are best used with methods to keep enemies clustered in a small area, such as a death pit, a hole deep enough that they cannot jump out.
Traps can be placed in the background by using ![]() 动, actuating them once, then removing the actuators so that further activations will not place them back in the foreground. This is useful for staggering traps, as a background traps will not block the path of another Trap's dart, spear, spiky balls, or flames.
动, actuating them once, then removing the actuators so that further activations will not place them back in the foreground. This is useful for staggering traps, as a background traps will not block the path of another Trap's dart, spear, spiky balls, or flames.
Note that enemies killed by Traps will not be counted by the Tally Counter and will not contribute to banners.
Tower of Death[ | ]
If you are in Hardmode and have acquired the Nimbus Rod and Wings or anything that allows flight, there's a very efficient and safe way to farm or survive most of these events by making a tall tower, 20 blocks or higher, at least 4 blocks wide, with two entrances from the ground for enemies to come in. At the top of the tower, place some Platforms right under you, enough to cover the width of it.
When an event occurs, place the two Nimbus Rod's Clouds on the platforms, and you will have a safe method to kill grounded enemies. Flying enemies will fly around the tower, so a weapon that can attack through blocks is recommended.
In Solar Eclipses however, the Mothron miniboss can go through blocks, making the strategy ineffective.
Invincibility Machine[ | ]


Image of the invincibility machine (not in use).
This technique involves overriding all forms of damage with the temporary invincibility granted when damage is taken from a weak enemy such as a statue-spawned slime. This is useful when dealing with Moon events, such as the Pumpkin Moon and Frost Moon, though it also works against bosses (with the exception of the Moon Lord, for whom special measures were put in place to prevent this). The machine fails if the protective slime is killed.
The machine consists of a small 5x6 box half-filled with Honey, such that the player will receive the Honey Regeneration buff, but without drowning. A Teleporter provides an easy way into the machine, and various switches are available to toggle traps and the actuated spawn surface. The Teleporter is optional; you could just actuate yourself in from the top.
It's important to note that the machine will only work if the protective slime is the oldest enemy on-screen. This way, the slimes spawned from the statue will have damage priority over any other mobs that spawn thereafter. Lastly, reactivate the spawn surface before starting the event. If any NPC is killed while the machine is in use, then it will fail.
The downside of an invincibility machine is that the player's options become limited. Generally, the best approach is to use a summoner build with the highest-damage summoning armor available and five damage-increasing accessories (Summoner Emblem, Papyrus Scarab, Necromantic Scroll, Hercules Beetle, and Avenger Emblem - all with the Menacing Modifier). Most summoning weapons can attack enemies outside while preserving the protective slime. The exceptions are the Tempest Staff, Stardust Dragon Staff, and Rainbow Crystal Staff. The Stardust Guardian will kill the slime if placed too close to the player, but it is okay to summon it at a distance.Note: If a sentry is summoned off screen it will despawn.
One of the few weapons that can be used from within the box is the Blizzard Staff, as its projectiles cannot enter the invincibility machine. The Meteor Staff can be used the same way, but the box must be constructed with a thicker ceiling, because the explosions can potentially kill the slime. Spears cannot be used, as the slime will periodically jump near the player's head area and enter the damage hitbox of the spear. In the late game, one can also set up a Staff of the Frost Hydra and Lunar Portal Staff for free damage. The Lunar Flare may be used to eliminate faraway enemies to either side, but any explosion that occurs too close to the machine will kill the slime. It also might not be a bad idea (if the player does not have the Cobalt Shield or any of its upgrades) to grapple to the side of the machine, because being knocked around by a slime is a little bit annoying (though it won't compromise the integrity of the machine). You can also simply place two target dummies next to each other, then build a row of any kind of block (with the exception of falling blocks and platforms) 8 tiles above the ground you put the target dummies on. Next step: get yourself a slimy saddle, and hop on the target dummies. Be careful not to hit the dummies with any weapons. Besides, you won't need weapons anyways. The slime will damage anything that hovers close to your player.
A better option may be is to place 2 target dummies close to each other then placing any blocks 4 blocks above the dummies. Now ride the slimy saddle and you will be invincible to most attacks. When a player bounces onto an enemy while riding a slimy saddle, both player and the enemy will gain an invincibility frame. Since the enemy gains a longer invincibility frame, by setting up two target dummies, you will always be invincible. Just do not use any piercing damage or else you will fall and you will take damage. Note that this tactic does not work for the Moon Lord.
Another idea would be to set up a teleporter circuit that constantly teleports you between rooms with heart statues lined up on the walls in each. This could also be combined with the idea above. With this setup, the player could teleport around, avoiding attacks and healing while under the immunity of the slime's attacks. However, this would make the project harder to set up as the player would have to build multiple copies of each room.
-
-
- 物群落钥匙或钥匙模
-
-
-
zh:指南:防御入侵事件