霜月是兩種月亮事件之一,另一種是南瓜月。此事件比它的對應物難得多,產出的金錢也更少,但掉落的武器則更加強力。
由於生成的敵怪和 Boss 數目多而實力強,因此最初可能很難活過該事件。
事件[ | ]
就像南瓜月一樣,該事件包含若干波數,其中最後一波會進行到夜晚結束。南瓜月包含 15 波,而霜月卻包含 20 波。為了推進波數,玩家必須擊殺敵怪,越強的敵怪給予的點數就越多。
在最初的幾波中,玩家只會遇見基礎敵怪,如![]() 屍精或
屍精或![]() 靈弓箭。隨着事件進程的推進,出現的敵怪會變得更強,還會包括特定的 boss 。
靈弓箭。隨着事件進程的推進,出現的敵怪會變得更強,還會包括特定的 boss 。
在第 4 波中,會出現第一隻常綠尖叫怪,這是一種行為與哀木類似的小 boss。雖然它的攻擊傷害和頻率竇恆,但它並不是一隻很難處理的敵怪,因為它的攻擊的垂直距離非常短,作為小 Boss 來說生命值又很低。
在第 7 波中,強大的聖誕坦克miniboss將會開始生成。它會使用其鏈式機槍發射高速的子彈、火箭構成的火力網,而禮物也會開始從天而降。它也會在地面上放置尖球,這會造成大量接觸傷害,足以在大師模式一擊殺死玩家。當生命值降低至一半時,它會變得更加有攻擊性。其鏈式機槍的極高傷害和射速使這隻miniboss極度危險,將其殺死的優先度非常高。
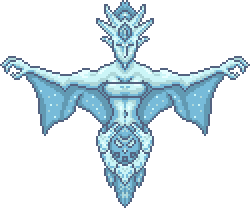
冰雪女王會在第11波時生成。她會發射冰雪風暴,對玩家造成中等傷害,並且有很高的機率觸發 ![]() 冷凍 及
冷凍 及 ![]() 冰凍減益, 使玩家的機動性受到極大的限制,甚至停止不動。另一種攻擊形式為"寒冰旋風",她將開始旋轉並朝各個方向發射碎冰。儘管這項攻擊難以躲避,但冰雪女王在完全停止動作時將會變得非常脆弱。 做足了準備的玩家可以透過保暖藥水以顯着地減少所受的傷害,冷凍減益所帶來的影響也能夠被解除,因此在對付冰雪女王時並不會有太多的困擾。
冰凍減益, 使玩家的機動性受到極大的限制,甚至停止不動。另一種攻擊形式為"寒冰旋風",她將開始旋轉並朝各個方向發射碎冰。儘管這項攻擊難以躲避,但冰雪女王在完全停止動作時將會變得非常脆弱。 做足了準備的玩家可以透過保暖藥水以顯着地減少所受的傷害,冷凍減益所帶來的影響也能夠被解除,因此在對付冰雪女王時並不會有太多的困擾。
在整個事件中,禮物寶箱怪將會取代其他怪隨機生成。它很容易被殺死,在被擊殺後會像迷你boss一般掉落心,這使得它成為值得攻擊的目標。
如同南瓜月事件,比起防禦,玩家更應該專注在輸出上,因為事件的目標為盡可能快速地推進,以獲得最好的收益。


| Type | |
|---|---|
| Environment | |
| AI Type | 哀木 AI |
| Damage | 110/165/247 (近戰) 86172258 (Pine Needle) 114228342 (Ornament) 80160240 (Ornament彈片) [4] |
| Max Life | 13000/16900/21547 |
| Defense | 38 |
| KB Resist | 100% |
| Immune to | \{\{buff\!mode\eimage\!id\e@@@@\}\}\{\{buff\!mode\eimage\!id\e@@@@\}\}\{\{buff\!mode\eimage\!id\e@@@@\}\}\{\{buff\!mode\eimage\!id\e@@@@\}\} |
| Coins | \{\{coin\!10000\}\}Pre-Hardmode: \{\{coin\!25000\}\}Hardmode: \{\{coin\!25000\}\}Post-Plantera: \{\{coin\!25000\}\}Pre-Hardmode: \{\{coin\!25000\}\}Hardmode: \{\{coin\!25000\}\}Post-Plantera: \{\{coin\!25000\}\} |
|---|
- Item (Quantity)Rate
- 在後面的波數中物品掉落率較高 [2]
- 會掉落以下 4 個物品之一 [2]
- 3.11% - 7.78%6.22% - 31.11%
- 3.11% - 7.78%6.22% - 31.11%
- 3.11% - 7.78%6.22% - 31.11%
- 0.67% - 1.67%1.33% - 6.67%

| Hurt | \l!--\_print\_sounds\n --\g\lspan\_style\e"margin-left:2px;"\g\{\{sound\!\!\{\{trim\!%%%%\}\}\}\}\l/span\g\l!--\n --\g |
|---|---|
| Killed | \l!--\_print\_sounds\n --\g\lspan\_style\e"margin-left:2px;"\g\{\{sound\!\!\{\{trim\!%%%%\}\}\}\}\l/span\g\l!--\n --\g |
- Internal NPC ID: 344


| Type | |
|---|---|
| Environment | |
| AI Type | 聖誕坦克 AI |
| Damage | 120/180/270 (近戰) 72144216 (Chain Gun) 160320480 (Spiky Ball) 84168252 (Missile) 100200300 (Present) [1] |
| Max Life | 18000/23400/29835 |
| Defense | 56 |
| KB Resist | 100% |
| Immune to | \{\{buff\!mode\eimage\!id\e@@@@\}\}\{\{buff\!mode\eimage\!id\e@@@@\}\}\{\{buff\!mode\eimage\!id\e@@@@\}\}\{\{buff\!mode\eimage\!id\e@@@@\}\} |
| Coins | \{\{coin\!10000\}\}Pre-Hardmode: \{\{coin\!25000\}\}Hardmode: \{\{coin\!25000\}\}Post-Plantera: \{\{coin\!25000\}\}Pre-Hardmode: \{\{coin\!25000\}\}Hardmode: \{\{coin\!25000\}\}Post-Plantera: \{\{coin\!25000\}\} |
|---|
- Item (Quantity)Rate
- 在後面的波數中物品掉落率更高 [2]
- 會掉落下列 2 件物品之一 [2]
- 5.55% - 12.5%12.5% - 50%
- 5.55% - 12.5%12.5% - 50%
| Hurt | \l!--\_print\_sounds\n --\g\lspan\_style\e"margin-left:2px;"\g\{\{sound\!\!\{\{trim\!%%%%\}\}\}\}\l/span\g\l!--\n --\g |
|---|---|
| Killed | \l!--\_print\_sounds\n --\g\lspan\_style\e"margin-left:2px;"\g\{\{sound\!\!\{\{trim\!%%%%\}\}\}\}\l/span\g\l!--\n --\g |
- Internal NPC ID: 346
| Type | |
|---|---|
| Environment | |
| AI Type | 冰雪女王 AI |
| Damage | 120/180/270 (近戰) 110 (近戰) 84168252 (Frost Wave) 70-74140-148210-222 (Frost Shard) [5] |
| Max Life | 34000/44200/56355 |
| Defense | 38 |
| KB Resist | 100% |
| Immune to | \{\{buff\!mode\eimage\!id\e@@@@\}\}\{\{buff\!mode\eimage\!id\e@@@@\}\}\{\{buff\!mode\eimage\!id\e@@@@\}\}\{\{buff\!mode\eimage\!id\e@@@@\}\} |
| Coins | \{\{coin\!50000\}\}Pre-Hardmode: \{\{coin\!125000\}\}Hardmode: \{\{coin\!125000\}\}Post-Plantera: \{\{coin\!125000\}\}Pre-Hardmode: \{\{coin\!125000\}\}Hardmode: \{\{coin\!125000\}\}Post-Plantera: \{\{coin\!125000\}\} |
|---|
- Item (Quantity)Rate
- 在後面的波數中物品掉落率更高 [2]
- 會掉落下列 4 件物品之一 [2]
- 4.44% - 7.78%15.56% - 31.11%
- 4.44% - 7.78%15.56% - 31.11%
- 4.44% - 7.78%15.56% - 31.11%
- 0.95% - 1.67%3.33% - 6.67%
 馴鹿鈴鐺在第 15 波及更高波數時0.56% - 0.83%3.33%
- 冰雪女王紀念章在第 15 波及更高波數時 在第 15 波及更高波數時
在第 8 波及更高波數時


| Hurt | \l!--\_print\_sounds\n --\g\lspan\_style\e"margin-left:2px;"\g\{\{sound\!\!\{\{trim\!%%%%\}\}\}\}\l/span\g\l!--\n --\g |
|---|---|
| Killed | \l!--\_print\_sounds\n --\g\lspan\_style\e"margin-left:2px;"\g\{\{sound\!\!\{\{trim\!%%%%\}\}\}\}\l/span\g\l!--\n --\g |
總體策略[ | ]
通用技巧[ | ]
This content is transcluded from 指南:實用技巧 § 戰鬥.
- 準備好你的 Boss 戰場 有足夠的光源,篝火 和紅心燈籠用於生命再生,如果你使用魔法,星星瓶可用於法力再生。巴斯特雕像將提供一個可觀的防禦性提升。花園侏儒能提高運氣,可減少所受的傷害並提高造成的傷害。池也可以用來進行額外的生命值再生。
- 向日葵 會給半徑 50 個物塊內的玩家施加快樂!增益,給予 +10% 的移動速度獎勵並降低 17% 的敵怪生成率。
- 至少始終攜帶一疊最高級的治療藥水(弱效治療藥水、治療藥水、強效治療藥水或超級治療藥水)。僅僅依靠自然的生命再生並不是一個好主意。
- 建議為在戰場中的樹妖 和護士 NPC 建造房屋。前者可以施放樹妖祝福 增益,增加你的防禦力, 並為你提供類似荊棘藥水的效果,而後者可以即時治療和消除減益,但需要花費一些 。
- Boss 會顯示在小地圖上: 在你苦苦尋找的時候,可以按照 Boss 的圖標來追蹤它。你可以通過查看其各自的 Wiki 頁面,來識別 Boss 的圖標。
- 如果你已經你在地牢中救出了機械師,你就可以使用電線來激活以及提供生命與法力回復的 心形雕像和星星雕像。前者可以幫你攻擊敵怪,但要注意擺放位置,以免在戰鬥中傷害到自己。後者可以分別連接心形雕像和星星雕像來提供心 和星星。把這些雕像連接到時來啟動它。
- 你可以在挑戰任何更難的 Boss 之前先召喚並殺死克蘇魯之眼或史萊姆王,這樣可以創造一個額外的一次性紅心池。注意,這將阻止任何心雕像產生新的心。
- 在你去探索、進行Boss戰或入侵之前,記得使用利器站、彈藥箱、水晶球、施法桌和蛋糕塊 。這些會給玩家帶來有用的增益,前四種是特殊物品。它們分別提供鋒利、藥、靈視、着魔和糖果衝刺。
地形準備[ | ]
This content is transcluded from 指南:戰鬥場地.


Extensive arena for the Moon Events, making heavy use of platforms, Asphalt and passive healing tiles.


Example of an arena, making heavy use of Traps. Note that on higher difficulties, Traps are hardly useful.
A flat surface about 168 blocks wide (See NPC spawning) will focus all spawns on the arena. Above it there should be a long platform of the same width, high above the ground in order to keep grounded enemies out of reach.
Since the player will mostly focus on the Bosses on the later waves, Lava pit and Traps may be helpful to take out the weaker enemies more easily. However, on higher difficulties the Traps' low damage is practically useless against the higher-health enemies, making them almost a liability due to the invincibility frames they provide and the risk of being hit by them and taking massive damage in the process.
It's also a good idea to make a room with a ![]() 床 near the Arena, so in case of death you can quickly get back to it.
床 near the Arena, so in case of death you can quickly get back to it.
裝備準備[ | ]
該事件可在世紀之花後的任意時間進行召喚,但考慮到其難度,最好還是在豬龍魚公爵和南瓜月之後在進行,但一般比光之女皇和天界事件時間上要靠前。
盔甲[ | ]
- For Melee, 蟲盔 with Scale Mail for offense. While Beetle Shell greatly increases survivability, it is better to maximize DPS when doing the event to increase the chances of getting loot out of it
- Rangers should use the 菇礦盔 with the headpiece that suits their weapon. Its set bonus is situational, but very useful in multiplayer mode and the earlier waves.
- It is better to swap the Shroomite Leggings for Spooky Greaves, as one extra minion and increased summon damage are generally more useful than the slight increase in critical strike chance and the set bonus. Additionally, the Shroomite Breastplate can be replaced with the Red Riding Dress, which will give a massive 25% summon damage bonus at the cost of a insignificant amount of ranged DPS.
- For a mage, the 靈盔 should be used with the Spectre Mask. The Hood should only be used to heal in a critical situation.
- The best armor for Summoners is the 森盔.
- The sentry set bonuses from the armors sold by the Tavernkeep shine in the moon events, as they can kill all of the grounded enemies easily.
武器[ | ]
- 對於近戰玩家:
- 波涌之刃和種子彎刀無論是對於群控還是單體來說都是十分值得信賴的武器。同樣也可以使用泰拉刃,但它在 Console version, Mobile version, Nintendo Switch version, and tModLoader version中較弱。
- 鑰匙劍對於生命值低於 40% 的敵怪有極高的 DPS,但它需要搭配十字項鍊才能更有效的使用。變態人的刀對於生命值更高的敵怪來說更強力一些。
- 星光是個更加安全和強力的替代品,但要獲取它則需要打敗更難的 boss。
- 豬鯊鏈球對於對付冰雪女王來說十分強力,但對於對抗地面上的敵怪與群控來說就不那麼厲害。
- 吸血鬼刀可被用來在關鍵時刻快速治療,但 DPS 較低。
- 靈液瓶可顯著提高輸出。
- 對於遠程玩家:
- 海嘯搭配,是一把極為強力的武器,對於推進至最後一波這一任務,是除畢業武器外的最強武器。
- 電圈發射器對於群控和單體目標來說都十分有效。毒刺發射器是較弱的替代品。
- 外星霰彈槍搭配水晶子彈是目前可得到的最強的槍。
- 對於魔法玩家:
- 利刃颱風可以打擊到目前存活的每一個敵怪,但缺乏對付單體 boss 的 DPS。
- 泡泡槍、激光機槍或蝙蝠權杖、高溫射線槍和幽靈法杖都可以幫助對付生命值更高的敵怪。
- 磁球、彩虹槍、雨雲魔杖和黃金雨是很好的備選武器。
- 對於召喚師
配飾[ | ]
- Wings, particularly those with hovering abilities such as Betsy's or the Hoverboard are helpful. However it's much better to use Mounts instead, as they are unaffected by the Chilled debuff and save accessory slots that would be used for mobility items.
- Damage increasing accessories such as any Emblem, the 天界殼, 天界石, 甲蟲莎草紙, the 狙擊鏡, 魔法箭袋 and its upgrades, among others, are extremely important to progress in the events.
- 冰凍護盾有利於存活。
- 天界手銬會在被擊中時快速回復魔力。
在該事件中,配飾應被重鑄為幸運或險惡。
坐騎[ | ]
坐騎允許你使用另一個配飾來代替翅膀和其他機動性物品,並不受冷凍減益的影響,所以它們是更加推薦的移動選擇。
藥水[ | ]
- 拾心藥水對於對抗minibosses來說極為有效,可以使你毫不費力地拾取掉落的心。
- 保暖藥水可使冰雪女王容易對付得多。
- 再生藥水、耐力藥水、生命力藥水和鐵皮藥水可大大提高存活能力。
- 任何可提供吃得好增益的食物物品都很不錯。
- 魔力再生藥水對魔法師來說必不可少。
- 暴怒藥水 and 怒氣藥水可以提升 DPS。
-
-
- 物群落鑰匙或鑰匙模
-
-
-
zh:指南:霜月攻略
- ↑ Information taken from the Desktop 1.4.0.5 source code, method
AI()inTerraria.NPC.cs(underaiStyle == 61) There may be inaccuracies, as the current Desktop version is 1.4.4.9.
- ↑ 2.0 2.1 2.2 2.3 2.4 2.5 見霜月以獲取詳細拾取物掉落幾率信息。Information taken from the Desktop 1.4.0.5 source code, method
RegisterBoss_FrostMoon()inTerraria.GameContent.ItemDropRules.ItemDropDatabase.csand classFrostMoonDropGatingChanceinTerraria.GameContent.ItemDropRules.Conditions.csThere may be inaccuracies, as the current Desktop version is 1.4.4.9. 引用錯誤:無效的<ref>標籤;name屬性「fmdrops」使用不同內容定義了多次 引用錯誤:無效的<ref>標籤;name屬性「fmdrops」使用不同內容定義了多次 - ↑ 3.0 3.1 霜月小 Boss的紀念章具有和其他拾取物不同的掉落幾率;見霜月以獲取詳細拾取物掉落幾率信息。Information taken from the Desktop 1.4.0.5 source code, method
RegisterBoss_FrostMoon()inTerraria.GameContent.ItemDropRules.ItemDropDatabase.csand classFrostMoonDropGateForTrophiesinTerraria.GameContent.ItemDropRules.Conditions.csThere may be inaccuracies, as the current Desktop version is 1.4.4.9. 引用錯誤:無效的<ref>標籤;name屬性「fmtrophies」使用不同內容定義了多次 - ↑ Information taken from the Desktop 1.4.0.5 source code,
Terraria.NPC.cs中 的AI()方法(在aiStyle == 57下) There may be inaccuracies, as the current Desktop version is 1.4.4.9.
- ↑ Information taken from the Desktop 1.4.0.5 source code, method
AI()inTerraria.NPC.cs(在aiStyle == 60) There may be inaccuracies, as the current Desktop version is 1.4.4.9.